Thursday, June 20, 2013

Choices, Choices.

We’ve decided on the caters and the menu.

We’ve decided on the photographer.

We’ve decided on the cake (flavors and style)

We’ve decided on our venue.

We’ve decided on almost everything that needs to be decided on, but when it comes to a rehearsal dress I can’t deicide on which one to wear to save my life!!!!!


I’ve had a harder time picking out a rehearsal dress than I had picking out a wedding dress!!! That just doesn’t seem right.  Here are the 3 contenders….which would you choose?

DSCN3943

The solid pink has 2 orange strips in it. How cute would it be with orange peep toe pumps and big orange chunky jewelry?  Gorgeous right?

The lace one in the middle….well it’s lace and I’m in love with lace. I think it has a rustic feel and I can dress it up or down. Rustic and lace, that’s a big part of our wedding theme too, oh and the dress is lace incase I forgot to mention it. Smile

The gray polka dot dress has pockets!!!! I love a dress with pockets! Plus it’s gray, which is my favorite color, and it’s polka dotted which I’ve always seemed to be drawn too!!!!

This decision is going to drive me nuts.

~Jess

Friday, June 14, 2013

This One is for the Kids.

There is a possibility we’ll have 20+ kids at the wedding. It’s apparently one of the side effects from getting married in your 30’s. All your friends either have babies or kids under 10. I remember what it was like to go to a wedding when I was much younger…..boring! I hope the kids at our wedding don’t get bored after the little something I came up with for them.
I ordered these cute wedding activity books and crayons online. They came in a little plastic bag like you would find in a store. I changed them a little bit and gave them a cute rustic feel.

I took them out of the plastic, wrapped the activity book in the brown kraft paper we’re using for everything (so it seems). I stuck the paper together with a glue dot, that’s a genius invention by the way!!! I tied the crayons with twine.
DSCN3914
I had some lace I had picked up a few years ago, long before I thought I would every get married again, let alone plan a wedding. Smile
DSCN3912
I tied it lace once around the book, place a set of crayons on top of the lace and then knotted the crayons with the remaining lace.
DSCN3915
I’m thinking of adding a candy necklace, or maybe a safety sucker, but I can’t decide it candy would be a good thing for kids to have while sitting through a wedding.
DSCN3917
I really really really hope the kids enjoy them.
~Jess

Wednesday, June 12, 2013

Wedding Jewelry.

Nathan and I celebrated our 3 year anniversary in May. He wanted to get me something sparkly. I love it when he  buys me something sparkly. I told him I think it would be super sweet to wear the jewelry he got me the day of our wedding. He liked the idea too.

Naturally we went to Etsy. We love buying handmade and have tried to buy from Etsy or local vendors as much as possible for the wedding items we’re not making. My wedding dress has some gorgeous sparkle along the bust and cap sleeves so no necklace is needed but I wanted earrings and a bracelet.  We both fell in love with what we found.
Here’s the bracelet, the long parts sneak up the back of the hand. It’s divine!!
DSCN3925
And the matching earrings!!!
DSCN3924
It’s as if the jewelry was meant for my dress. I wish I could post a picture of my dress right here so everyone could see just how perfect they all are together.

Here's the name and link to the wonderful handmade jewelry shop Nathan purchased these from. All of the pieces are so beautiful!.  Eminjewelry

*sigh* I’m a happy happy bride-to-be!
~Jess

Thursday, June 6, 2013

Happy Tears.

I kicked around the idea of putting tissues or a vintage handkerchief in the Burlap Chair Pockets, but not everyone cries at weddings. As badly as burlap sheds I didn’t want to pull the pockets out again and  mess with them anymore than necessary.

I found the below chest/box at Hobby Lobby and had original thought of using it for our Guest Box but it ended up being too big.
DSCN3909
It’s a deeper chest than I wanted so I just added pillow stuffing to the bottom of it.
DSCN3903
I then cut a piece of burlap to fit over and around  the stuffing and tucked it all in under the burlap. (I forgot to take a picture of this step!)

Remember the post I had on how to print on burlap? I did it again for the sign below.

After I printed, I cut and glued it to a piece of cardboard and added the lace flower, then glued it onto a craft stick. I stuck it in the corner of the box behind all the stuffing. It’s not heavy so I didn’t have to permanently secure it to the box.
DSCN3905
Look at some of the pretty vintage handkerchiefs I bought online. I kind of don’t  want to part with any of them!!!!
DSCN3908
Next step was to arrange all the pretty vintage handkerchiefs I bought online and voila. Our Happy Tears box of handkerchiefs is ready to sit next to the Guest Box for all those that want to take one for the ceremony. Smile
DSCN3906
One of the easiest and quickest things I’ve put together for the wedding so far.
~Jess


Monday, June 3, 2013

My Something Blue.

I’m not a shoe type of girl. Nathan has more pairs of shoes than I do. My oldest daughter has more pairs of shoes than I do. It shouldn’t surprise anyone that I didn’t give very much thought to what kind or color shoes I should wear on my wedding day. No one will see my shoes anyway….so did it really matter what I wore on my feet?
I decided to look around just to see what was out there and maybe venture out and get a pair of something I wouldn’t normally wear.
Then I happened upon a shoe that I literally fell in love with at first sight.
They were at PinkBasis.com  which I swear is a website to help clothe strippers.
They helped fill in the requirement of 'something blue'. 
They were only $10….so what did I have to loose?

I ordered them, excitedly put them on the second they arrived last Tuesday….
wedding shoes
…and have wanted to wear them every second of every day since.
~Jess

Wednesday, May 29, 2013

Hat Box Make Over Part 2!

The hat box was driving me crazy just as it was. It was missing something….I know you agree.

DSCN3835

I learned how to print on burlap a few days ago. It was very easy.  Cut a piece of burlap and freezer paper to fit a piece of paper. Iron the burlap to the shiny side of the freezer paper (I had to use the hottest setting on my iron along with the steam setting!) Trim the edges. You don’t want it getting stuck in your printer. Then type up whatever you want printed on your burlap, send it through the printer and voila!

DSCN3848

I hot glued this to the front of my hat box, added a burlap flower and tassel that I’ll blog about here later on and called this project finished!

DSCN3847


Thursday, May 16, 2013

Hat Box Make Over.

We were looking for a reasonably priced wine barrel. We learned there was no such thing. We resigned ourselves to the fact that we’ll  have to spend at least $100 just to have a wine barrel for the ceremony. *sigh* We’ll use it after the ceremony for a rain barrel, but I was hoping to find one for maybe half that. In the process of looking for a wine barrel we found a great antique store where we found this little gem of a hat box. 
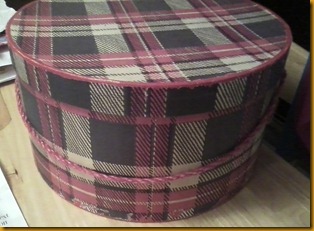
hat box original

Doesn’t really fit into the burlap and lace theme huh?  My bright idea was to bring it home, drench it in Gesso and then paint it a chocolate brown and use it as a favor box.  This is what the lid looked like after 5 layers of Gesso, 1 layer of white colored paint and 1 layer of cream colored paint.
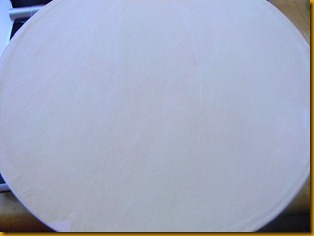
DSCN3830

You can still see the plaid through all that paint too can’t ya?

So I scrapped that idea (who has the time for who knows how many more coats of paint right?)  I measured the top of the box to the bottom (7inches)  added 2 inch for a total height of 9 inches. Then I measured all the way around the box  and added 1/2 inch for a total of  41 inches. I cut a piece of burlap 41’’ x 7’’. I hot glued one edge of burlap to the box leaving an inch above the top of the box and an inch hanging below the bottom of the box.
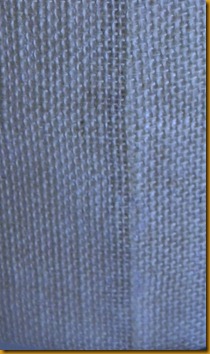
DSCN3833

Once I got all around the box I overlapped my seams a bit for a cleaner look and hot glued it down. I chose to overlap because it’s hard to butt burlap up against each other.

Now you have a funky looking box with too much fabric hanging off the top and bottom of it. Every few inches or so I cut the burlap almost down to the top edge of the box (on top and bottom) making little burlap flaps. Fold the burlap flaps down into the opening of the box and down onto the bottom of the box and hot glue it for a round look.  Here’s a picture of the inside of the box with the cut burlap flaps glued down.

DSCN3834 

Then I measured out 41inches of lace, cut it and carefully hot glued it to the top edge of the hat box.

DSCN3835

I feel like it needs more, but it’s beyond me as to what else it needs. Maybe I’ll paint the word ‘Favors’ on it so that guest know to take one? Maybe I’ll paint “Favors, Take One'” on it instead.  Can you tell I’m undecided? Me too. It’ll come to me. I have this on my sewing desk now so that it will stay in the forefront of my mind. Hopefully something will jump out at me and I’ll find that last finishing touch for it before too long.

~Jess